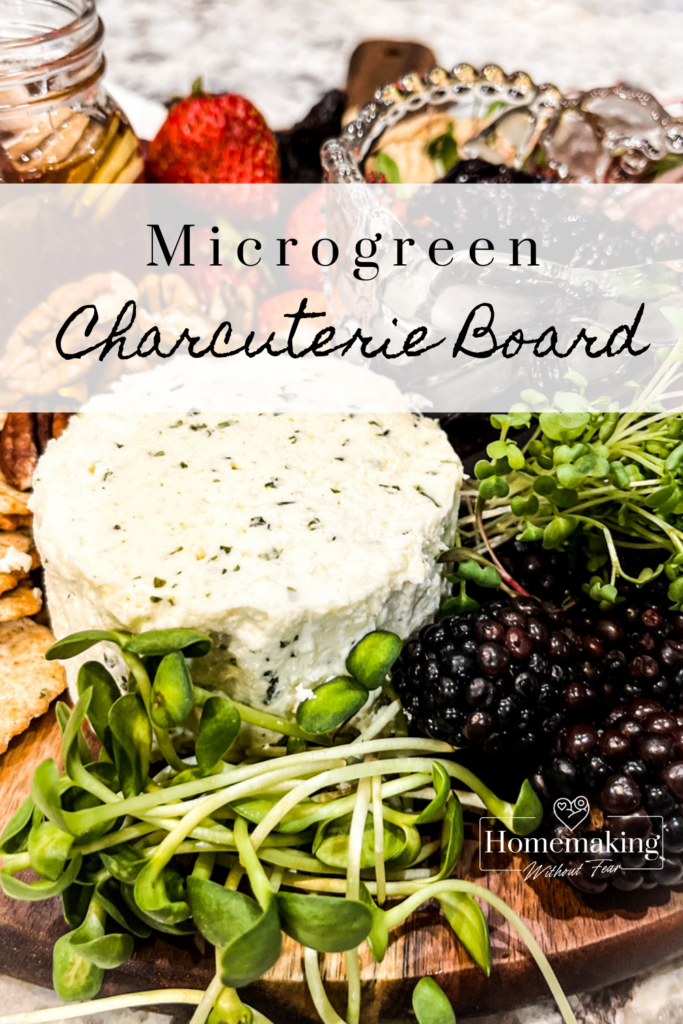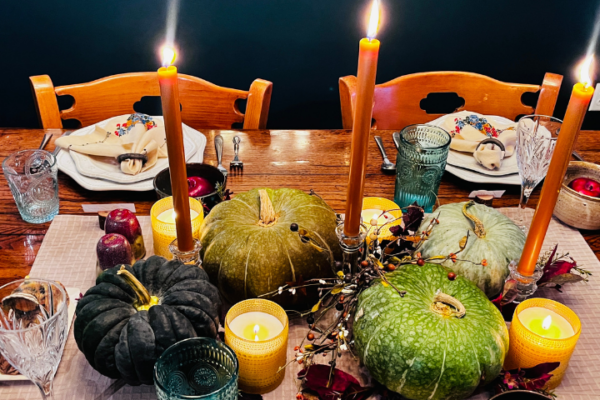
Charcuterie boards are beloved by hosts and guests alike AND for good reason! They look super fancy but truthfully they are not difficult at all. With a few easy steps and gorgeous finishes (like microgreens) ANYONE can do this. They are absolutely stunning for a Holiday gathering or even weeknight get-together. Let me show you how to make one, start to finish, in 5 easy steps! THEN take it the extra mile with finishing touches that make a humble charcuterie board absolutely stunning. A Microgreen Charcuterie Board would be the perfect addition to your holiday table.

What is a charcuterie board?
Charcuterie is a French word for a certain type or way of cooking or making prepared meats. Bacon, sausage, hams, salami, mortadella, capicola or prosciutto may be familiar to you. Salting, seasoning, dehydration or curing are all part of this type of meat processing and the result is flavorful and delicious. You will likely find these types of charcuterie meats center stage on any charcuterie board.
Specialty cheeses, sweet or savory spreads and fruits of all kinds are excellent accompaniments to these meats and fill out the perfect charcuterie board.
. . .BUT what may be NEW for you is adding microgreens! Herbs or edible flowers are sometimes added for looks but who wants to chomp down on a large raw herb with their scrumptious meats & cheeses?
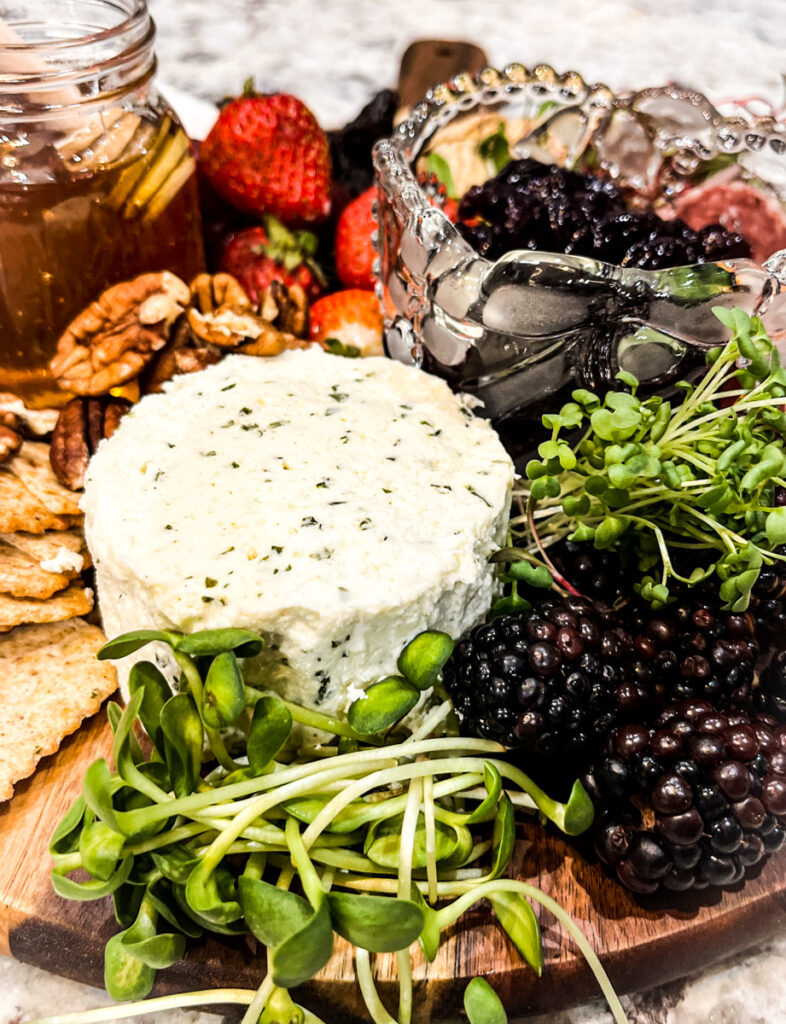
Microgreens however give that loose organic shape, soften the edges and add a gorgeous green pop of color. Not to mention add delightful flavors.
Microgreens aren’t just food confetti they are absolutely delicious too!
We could talk about the health benefits of microgreens (there are many) BUT around here we eat them because we grow them and because the really, really are very tasty.
Why add microgreens to a charcuterie board?
Charcuterie boards are getting more and more popular. You will find them these days at weddings, baby showers and even birthdays. Any celebration is appropriate for a lovely, variety packed charcuterie board with all those tasty little bites.
Microgreens are different and a little unexpected.
You can surprise and delight your guests with all the beautiful AND yummy, healthy options. After all, that is what is so fun about charcuterie isn’t it? Building that perfect little bite!
Microgreens add welcome bright, fresh flavor and crunch to the combo of delectable meats, rich cheeses & flavorful spreads.
What types of microgreens work well for charcuterie boards?
I recommend microgreens that have a sturdiness to them. They will be out at room temperature for a time before eating so the more delicate greens may begin to wilt.
Some wonderful options for charcuterie board microgreens are:
- Sunflower Shoots – mild, sweet, nutty perfection – sooooo good with cheeses!
- Micro Radish – colorful mix or china rose radish adds a mild spice.
- Mustard microgreens are a favorite of mine for the horseradish, wasabi type spice. A very nice accompaniment to rich cured meats.
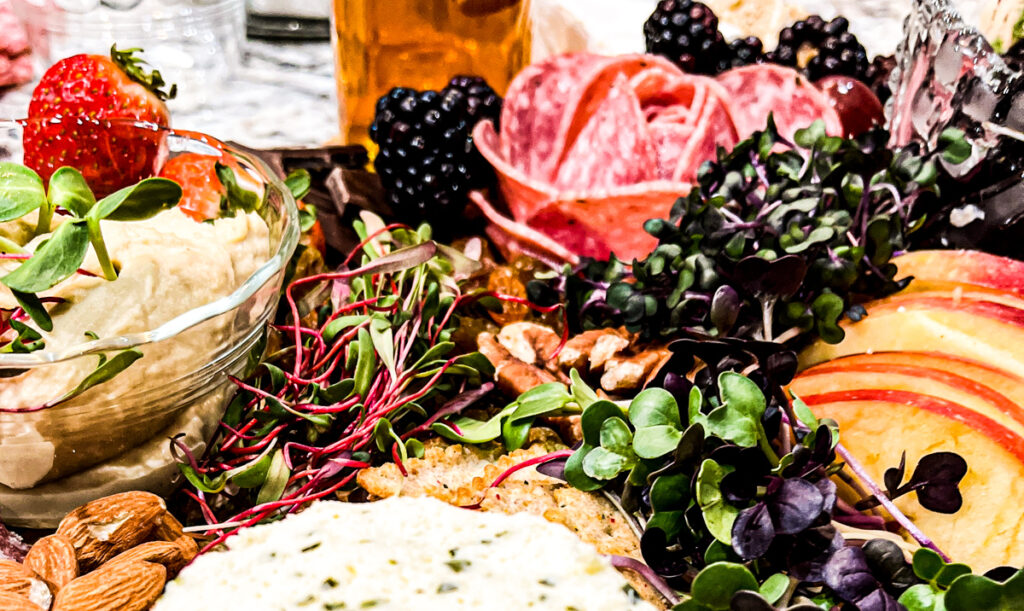
- Purple Kohlrabi, Bull’s Blood Beet or Red Cabbage add a very pretty color to a Holiday Charcuterie Board.
Let’s make a stunning Microgreen Charcuterie Board together. I promise I’ll make it super simple for you . . . Shall we!?
Step 1. Determine how big to make your microgreen charcuterie board.
This may be the most difficult part. I hate not having enough food but most of the time the charcuterie board isn’t meant to be the main meal. Determine first if it will be served as an appetizer along with other options and a main meal to follow OR if the charcuterie board itself will be the main meal. I have seen some people using their dining room table tops as the base for their charcuterie board.
Rule of thumb for how big to make your charcuterie board:
Determine how many people you would like to make your board for. If the charcuterie board is meant to be an appetizer/snack option then plan about 3-4 slices of meat (all different kinds) and 1-2 ounces of cheese per person (all different kinds).
If the charcuterie is meant to be more of a “main meal” double these amounts!
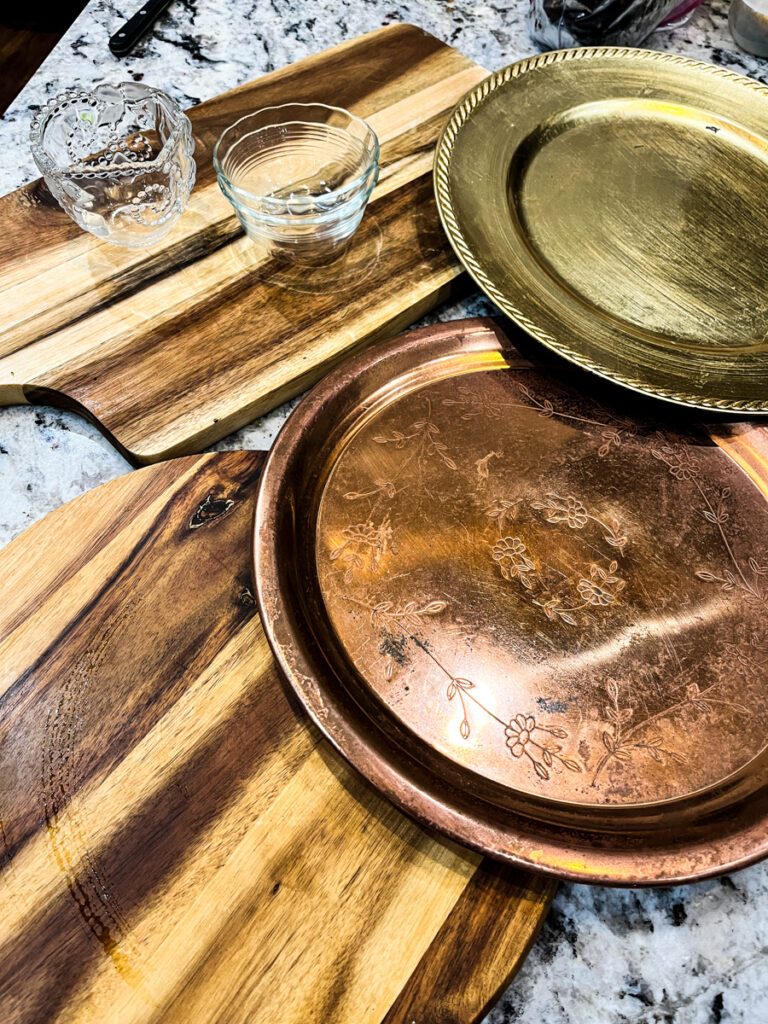
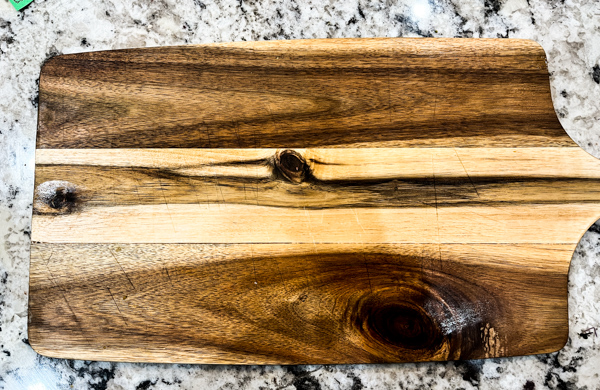
Step 2. Pick your board, plate or platter.
This is so fun because you can use ANY type of board you like. It does have to be a good size to fit all the goodies. I would recommend at LEAST an 18 by 18 inch size to serve 5 people . You could definitely use more than one board, platter or pate.
Cutting boards, larger ceramic plates or marble platters are all beautiful ideas. Be creative and look around your house first to see what you may have.
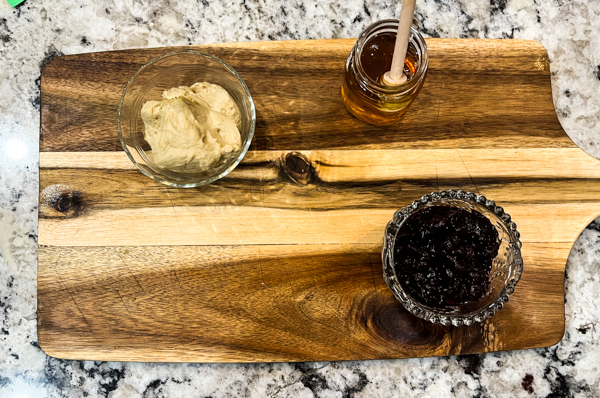
You don’t necessarily have to run out and purchase anything. Small little bowls or jars are will also be necessary for spreads, sauces or dips.
The don’t have to all match! In fact, mixing and matching is quite charming.
Here is a selection of plates, platters, bowls and boards I found. . .
Step 3. Select all your components – including microgreens for your charcuterie board.
Just gather everything together that you think you may want to use on your charcuterie board. I like to keep everything grouped together but individually wrapped & refrigerated until right before it’s time to eat or go to a party.
If you prefer to assemble your charcuterie board ahead of time, place the bowls/containers for dips and spreads on the board but don’t actually add them until right before serving. Meats, cheeses, fruits and extras can be added ahead of time as well. Don’t add breads/crackers until right before serving. If you refrigerate them on the board with all the other goodies, they will likely get stale.
Charcuterie boards are best served chilled and as fresh as possible. In Step 4, I’ll share with you the simple process for perfectly styling all of these goodies.
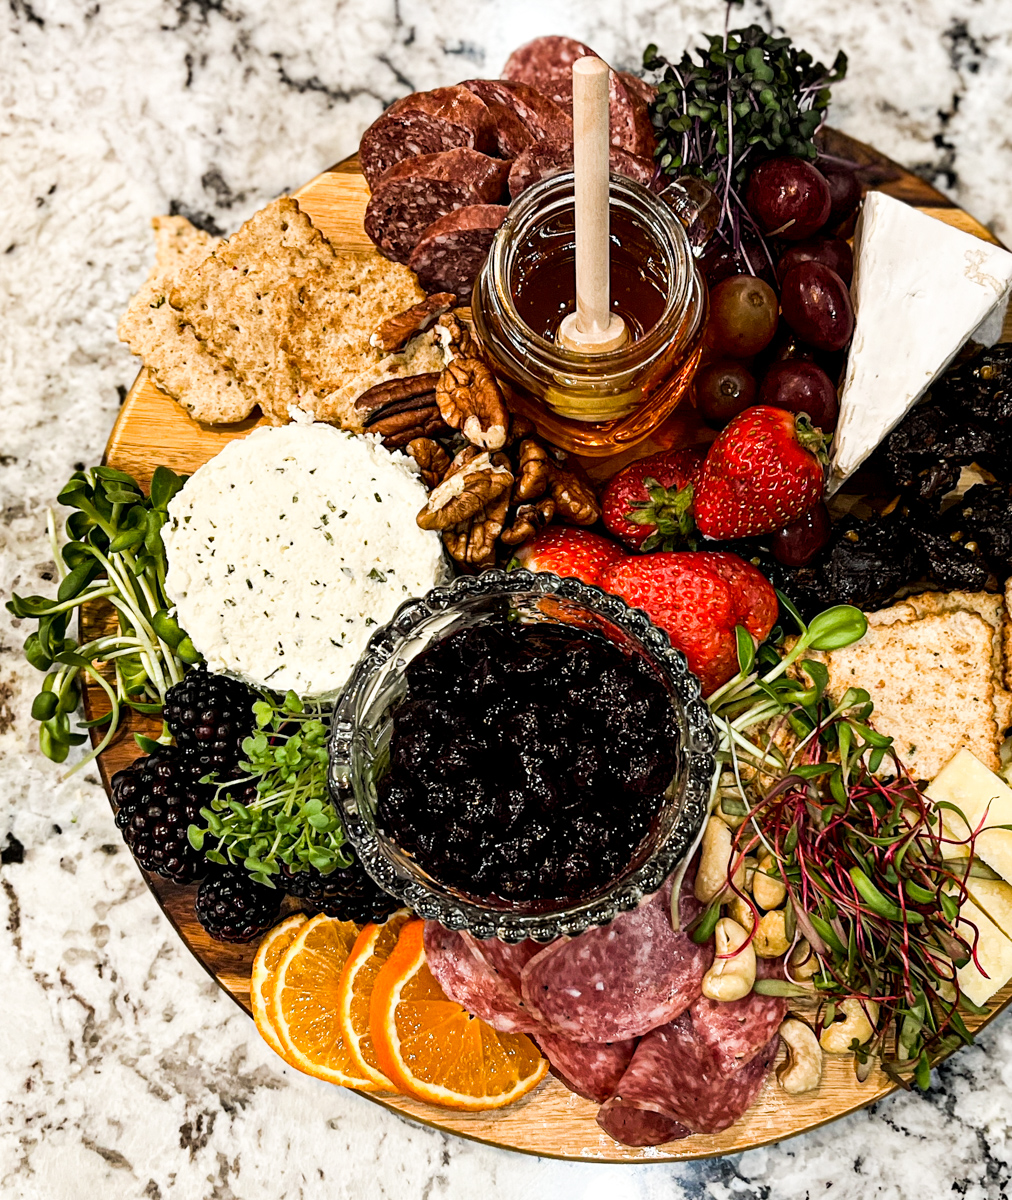
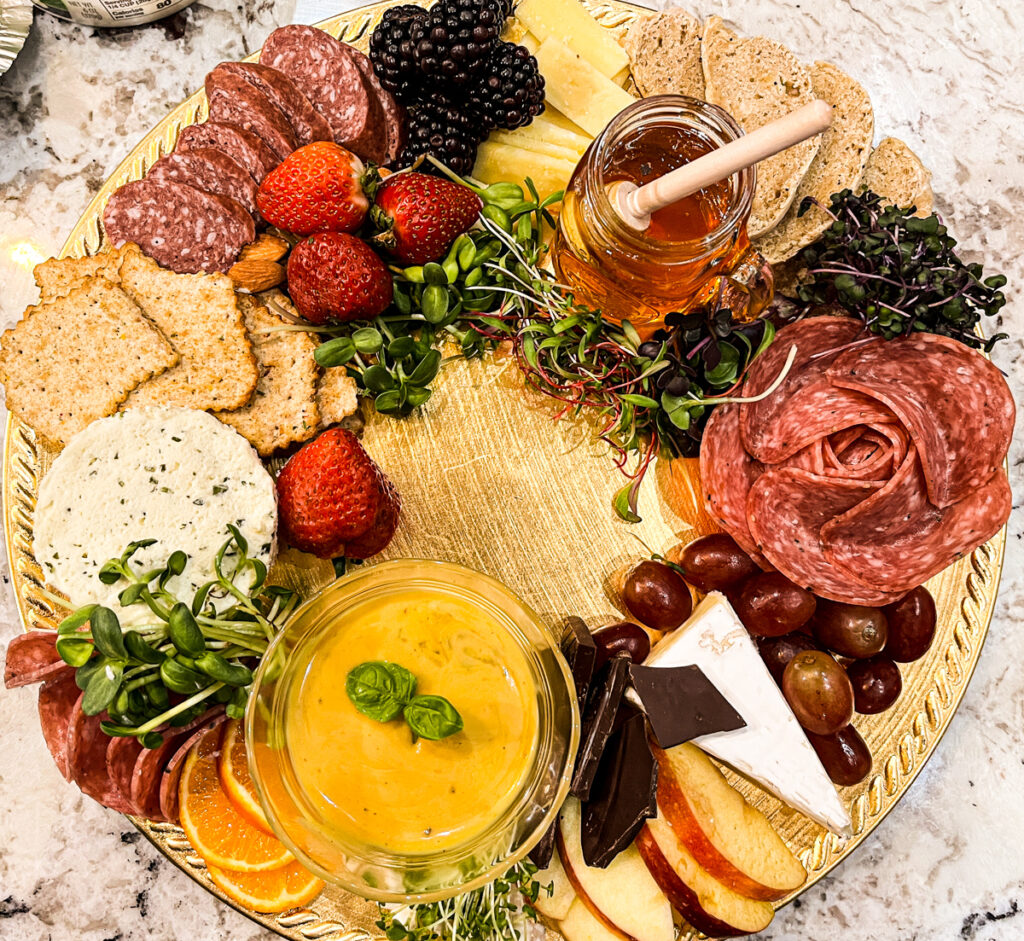
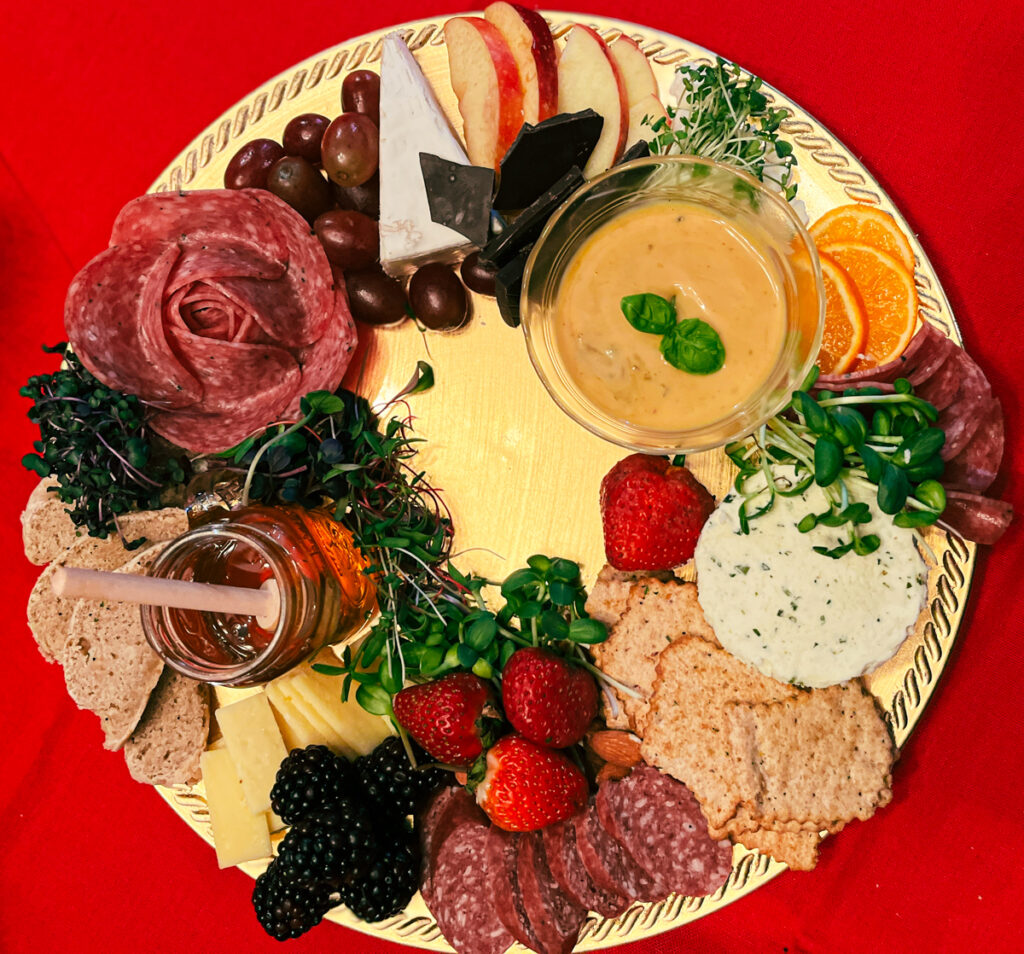
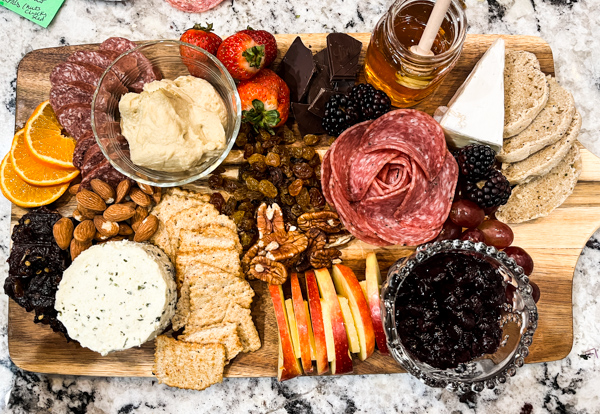
Meats
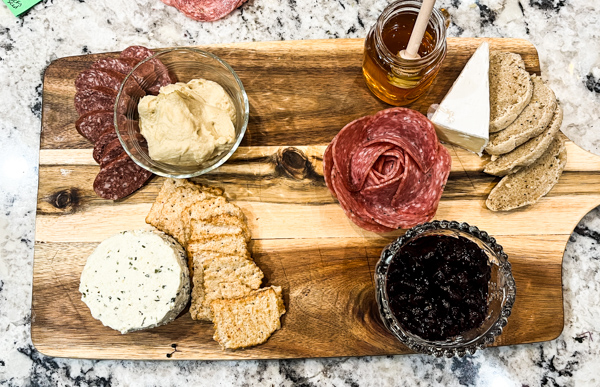
Choose 2-3 types of meats. I recommend choosing a mix of mild to spicy
Examples: salami, pepperoni, prosciutto, summer sausage, capicola. Even little bite size chunks of good quality meat sticks work. You don’t have to spend a lot of money here.
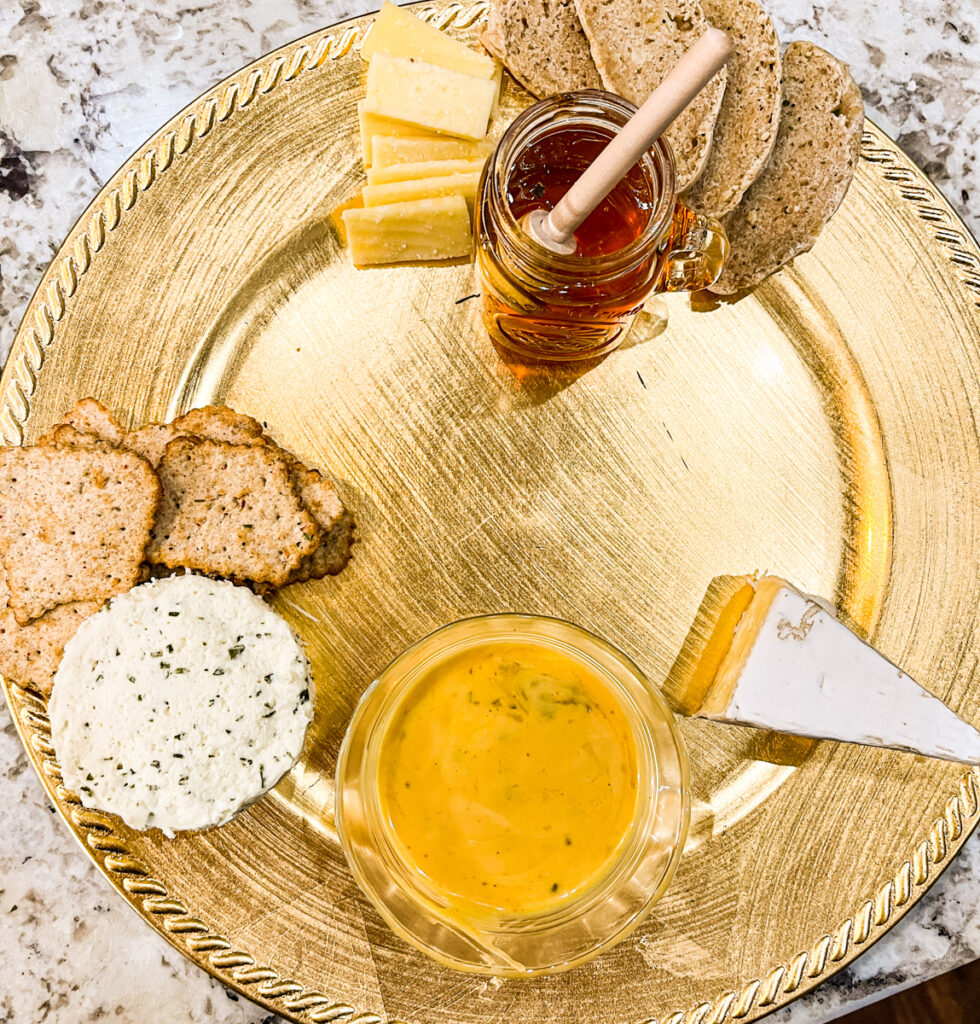
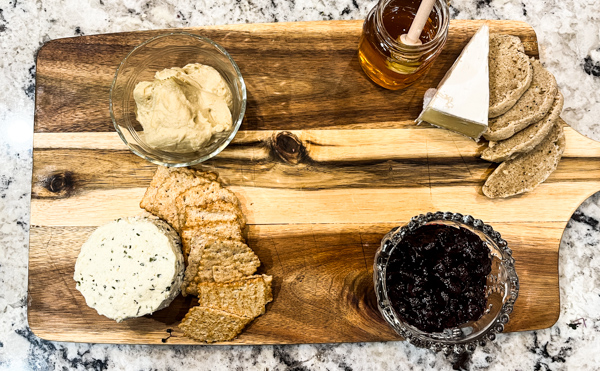
Cheeses
Choose 2 to 3 types of cheeses. Mix soft and hard cheeses along with flavor profiles that go from mild to sharp.
Some examples of softer cheeses are: muenster, harvarti, brie, flavored cream cheeses and mascarpone. I really like the soft, milk flavored varieties of Boursin Cheese.
Some examples of hard cheeses (best if pre-sliced or served in shaved pieces or chunks): parmesan, asiago, gouda, gruyere, cheddar and Colby.
For extra flavor and texture try a blue cheese crumble like Gorgonzola, marbled jack, feta or goat cheese. YUM!
Fruits
Choose 2-3 kinds of fruits. Focus on seasonal fruits if possible. Now that may be hard in the winter & Holiday time depending on where you live BUT be creative and mix a fresh fruit with dried.
Some examples of fruits I like to add to charcuterie boards: grapes, blackberries, blueberries, orange wedges, raspberries, strawberries and sliced apples.
For dried fruits: pineapple, mango, raisins, prunes, figs, cranberries, apricots!
Spreads
Go with 2-3 types of spreads and mix sweet and salty type flavors. A mustard spread is always a favorite for me. You could choose a simple store bought grainy, country mustard. Maple mustard or speciality honey mustards are delicious as are maple onion jams. Jams or marmalades such as orange, strawberry, cranberry or fig go nicely with rich cheeses.
Olive spreads aka tapenade or humus types spreads are also a favorite. For a kick, try sweet pepper or caramelized pepper jams. Sweet pickled jalapeños aka “cowboy candy” are simply divine!
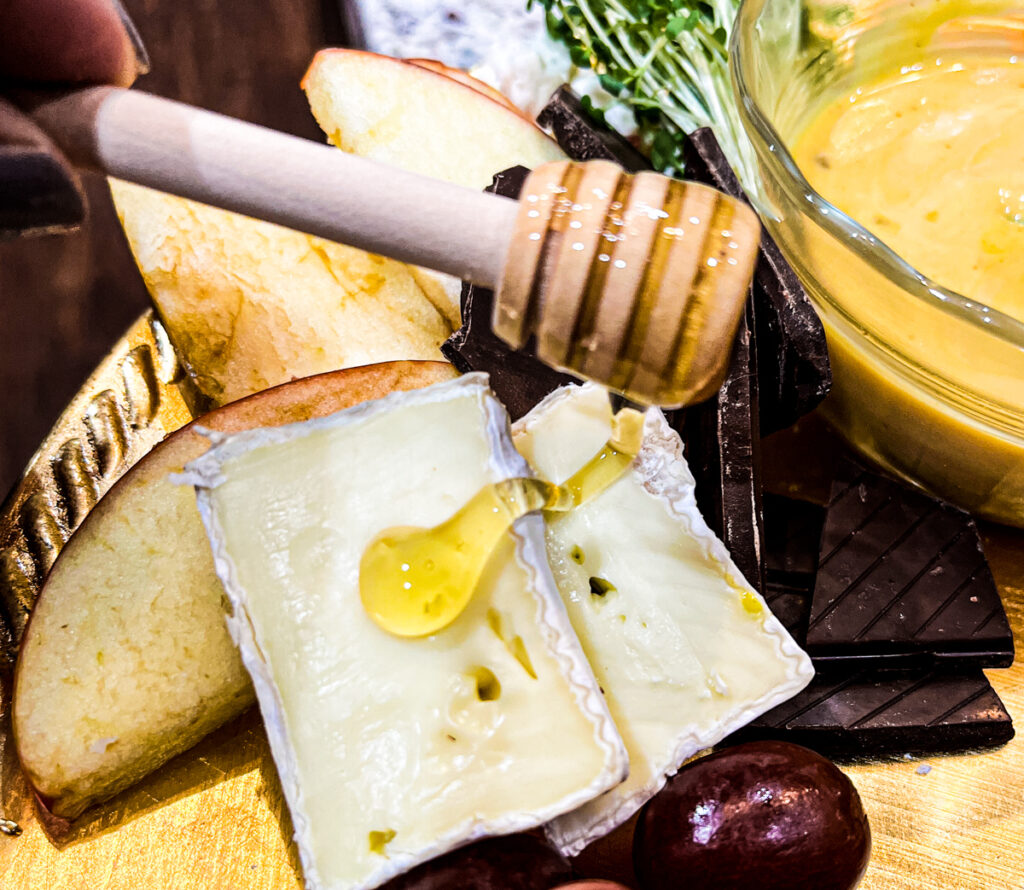
Cream cheese spreads are also a favorite in our home. You can even choose something as simple as a raw honey – it’s sooooo delicious drizzled over fruits and cheeses like brie and cheddar!
Crackers or Breads
Choose 2-3 types of crackers or bread. Bread sticks, flatbreads, rice crackers, sliced or toasted french bread rounds, flavored or plain butter crackers and toasted sourdough bread are all wonderful options.
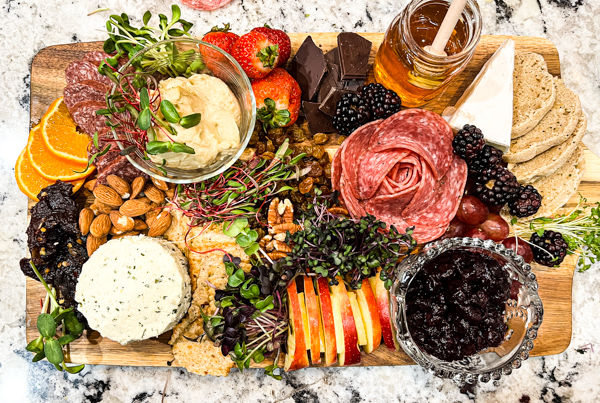
Microgreens & Extras
Microgreens are an absolutely beautiful addition to a charcuterie board. I keep microgreens growing in my kitchen at all times. There are all kinds of microgreen kits you can find to help you grow them fast and easy in your own home. Visit Home Microgreens Online Store and order yourself a kit!
This is a Home Microgreens affiliate link, which means I may make a small commission at no extra cost to you. See my full disclosure at homemakingwithoutfear.com. Furthermore as Home Microgreen’s Affiliate I may earn from qualifying purchases. I know you will love their products. We thank you for your support.
The extras to me are the fun part! These really fill in and finish the board to make it beautiful. Chocolates, nuts, fresh herbs and edible flowers are all wonderful options.
I also consider pickled/fermented veggies as extras: pickles, olives of all kinds- I love adding olives to charcuterie boards!, pickled beets or pickled jalapeños peppers add a really nice acid bite to cut the richness of meat and cheese.
4. Follow this specific step by step method to perfectly style your Microgreen Charcuterie Board.
Start by adding your larger items to the board first – place small bowls that you may use to add dips, spreads or sauces. Place them randomly and separate them across your board. Reserve the sauces/spreads themselves for adding right before serving.
Next add your cheeses and separate them from one another. Don’t group the cheese together. Imagine you are painting a picture and the board is your canvas. Spread items around the board, and think about symmetry and balance. BUT it doesn’t have to be perfect!

Now add crackers or bread to the board – keep them close to the cheese for easy selection.
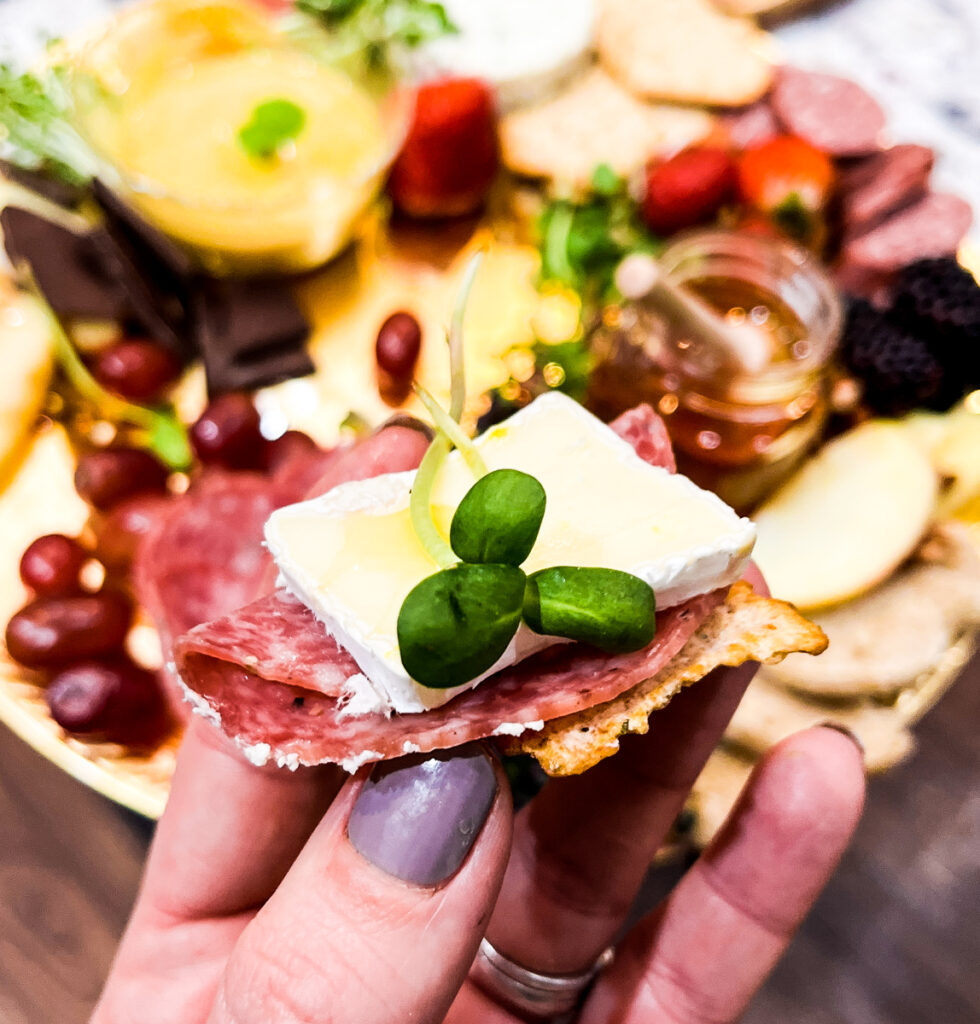
Now add meat by tucking them in close to other items on the board. Keep the sizes small and grab-able/snack-able. You want your guests to be able to easily grab individual items. If you have a large piece of loose meat consider folding it or even wrapping it around fruit to make it easy to grab. An example of this would be wrapping a piece of prosciutto around a slice of pear.
Add fruit by placing it in clusters throughout the platter. Separate dried fruits from fresh.
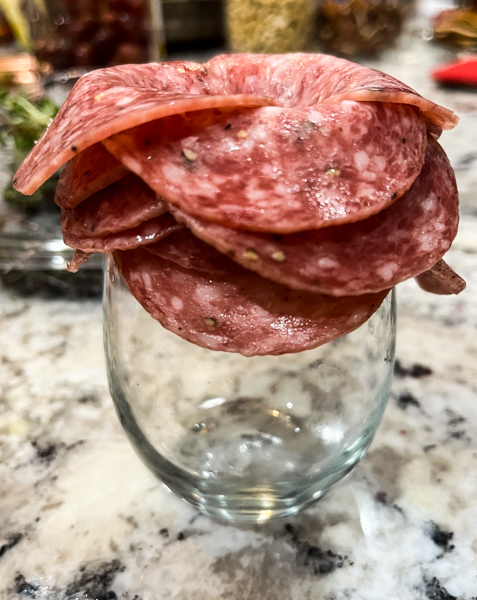
How to make a salami rose for a charcuterie board
A fun way to add meats to a charcuterie board is by folding them to make them easy to grab, fanning them out slightly or by making this simple rose you see below. To make this easy, use a small glass or cup and layer sliced meats around the rim in 3-4 layers, overlapping each piece as you go. Flip the glass upside down on the board where you’d like to place the charcuterie rose. How fun!


Step 5. Add Microgreens & all the fun little “extras” to take your board over the top!
Fill in the extra gaps on the board with good dark chocolate, herbs, seeds, nuts, flowers and MICROGREENS!
These finish touches really make the charcuterie board extra beautiful. Don’t you think?
Charcuterie boards are BEST if assembled right before you plan to set them out to be devoured.
Don’t forget setting out small serving utensils like little tongs, forks, little spoons for spreads and cheese knives.
Want to learn how to grow your own microgreens?
I grow microgreens for my family but also a small business. I was surprised at how fast and easy it is to grow your own veggies even if you have no land. You can grow indoors and even use recycled containers.
Read more about growing microgreens in this post:
Want to learn even more about microgreens?
The Home Microgreens Store is your one stop shop for ALL things microgreens. Learn how to grow them on a smaller at home scale. Then order supplies like growing trays and seeds all in the same place. Todd has put a lot of time in researching, testing and writing about growing microgreens at home. He is an excellent teacher and has wonderful resources. Checkout The Home Microgreens Store today!
This is a Home Microgreens affiliate link, which means I may make a small commission at no extra cost to you. See my full disclosure at homemakingwithoutfear.com. Furthermore as Home Microgreen’s Affiliate I may earn from qualifying purchases. I know you will love their products. We thank you for your support.
Here are some other recipes I know you will love!
Microgreen Radish Mexican Coleslaw
Click the page below to see ALL my microgreen recipes!
Pin 5 Simple Steps To A Stunning Microgreen Charcuterie Board for later: